Using Simple Hotcopy
Simple hot copy allows you to take a copy of your database archive without stopping any Storage Managers (SMs).
Unlike the other forms of hot copy the result is a direct copy of the archive, not a backup set. It is equivalent to performing an offline backup but without the overhead of a redundant SM.
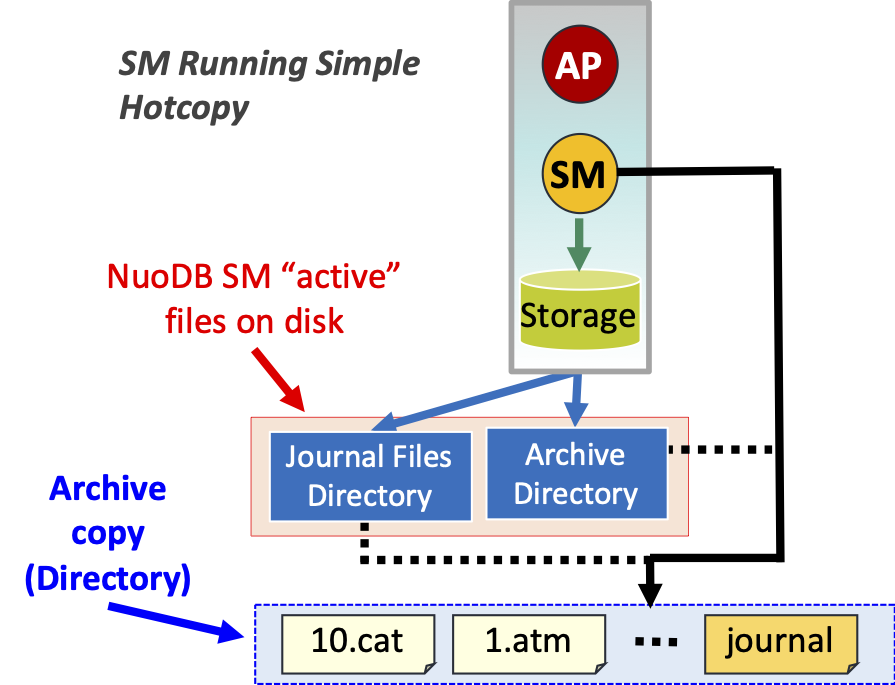
Note that if you had your journal in a separate directory to the archive, the backup copies the journal into the target directory with the rest of the archive.
You may wish to move it to a separate location again - if so, remember to specify the journal location using --journal-path when running nuocmd create archive.
Before using, ensure the correct ownership of the restored archive and journal directory:
-
You will need to be
rootor havesudoaccess to do this:-
Bare metal/VM: Run
chown nuodb:nuodb <dir> -
In a Container: Permissions should be set for you, but if necessary run
chown nuodb:root <dir>(note the group isrootnotnuodb). See also the restore Helm chart which can automate this process.
-
Example: To perform a simple hot copy for database test from the archive with id=0 into /volumes/backups/test-2022-04-18:
nuocmd hotcopy database --db-name test --type simple --backup-dirs 0 /volumes/backups/test-2022-04-18You can call your backup whatever you want, but a convention will make backup management easier. Here we use the database name and the date the backup was taken.
|
During a simple hot copy, NuoDB adds the Hence, if a simple hot copy operation fails, you might find instances of the |
Restoration Scenarios
Creating a New Database
Common Scenarios: Copy a production database for support, testing or debugging purposes. You might also need to create a copy for legal or regulatory reasons.
Procedure
-
Copy the simple backup archive to the desired host.
-
If you intend to run multiple SMs, optionally copy the simple backup archive onto each SM host to reduce SYNC time.
-
-
Optionally, move the journal to its own directory (typically on a dedicated volume)
-
Ensure ownership of the archive and journal directories is correct (see above)
-
On each SM, initialize the archive using
--restored(--journal-pathis optional):nuocmd create archive --db-name <db-name> --restored --archive-path <location-of-copied-archive> [ --journal-path <location-of-copied-journal ] -
Create the database in the usual way:
nuocmd create database --db-name <db-name> ...
Example 1: Create New Database From Backup
Scenario: Create new database test2 running a single SM on host server0 and a TE on host server1.
Both the archive and the journal have dedicated mounted volumes.
We will use the backup from database test in directory test-2022-04-18.
# On server0
#   Assume the backup, test-2022-04-18, has been copied to the current directory

# Copy files
mv test-2022-04-18 /volumes/archives/test2
mv /var/opt/archives/test2/journal /volumes/journals/test2

# Ensure correct ownership
chown nuodb:nuodb /volumes/archives/test2
chown nuodb:nuodb /volumes/journals/test2

# Define the archive and start the new database (test2)
nuocmd create archive --db-name test2 --restored --archive-path /volumes/archives/test2 --journal-dir /volumes/journals/test2
nuocmd create database --db-name test2 --dba-user xxx --dba-password xxx --te-server-ids server1
Once this database has been restored, its DBA user name and password will be whatever they were in test when the backup was taken.
Restoring a Database to a Known State
Common Scenario: Development and testing, so that the results of running known queries are always the same.
To do this take the database offline and replace its archives and journals. If you are careful, it can be done without deleting the database and recreating it (note the warning below):
-
Stop the database, all TEs and SMs, using
nuocmd shutdown database -
Delete the archive on every SM host and replace it with the simple backup archive.
-
By default the journal is in the backed up archive. If the SMs expect it to be somewhere else:
-
On each SM remove the old journal directory and copy the restored journal directory in its place.
-
-
Ensure ownership of the archive and journal directories is correct (see above)
-
Restart the database using
nuocmd start database
This can only be done if the hot copy backup being used is from the database being restored.
Suppose you have created a new database db2 from a backup of db1.
You cannot use a backup of db2 to restore db1 as it will have a different internal id.To use a backup from db2, you must first delete database db1 and recreate it from the db2 backup - see Example 3: Replace Database From a Backup.
|
Example 2: Restore Database to Earlier State
In this example we are replacing the database "in-place" by replacing its underlying files and directories. The database must be offline.
Scenario: Replace database test running a single SM on host server0 and a TE on host server1 with the backup.
Both the archive and the journal have dedicated mounted volumes.
The backup must have originally come from database test.
|
# On server0
#   Assume the backup, test-2022-04-18, has been copied to the current directory

# 1. Shutdown the database
nuocmd shutdown database --db-name test

# 2. Check database is no longer running
nuocmd show domain

# 3. Replace archive and journal
rm -R /volumes/archives/test
mv test-2022-04-18 /volumes/archives/test
rm -R /volumes/journals/test
mv /volumes/archives/test/journal /volumes/journals/test

# 4. Ensure correct ownership
chown nuodb:nuodb /volumes/archives/test
chown nuodb:nuodb /volumes/journals/test

# 5. Restart database
nuocmd start database --db-name test --te-server-ids server1
If you had multiple SM hosts, copy the archive to each of the other SM hosts and repeat steps (3) and (4) on each host.
| This procedure can also be used to reduce SYNC time for an SM that has been offline. In this case we use the most recent backup available and restore the database to a later time instead of an earlier one. This is only worth doing if the SM has been offline for a long period or during a time of many updates (such as a close-of-business or end-of-quarter). |
Example 3: Replace Database From a Backup
Sometimes the only way to return a database to a previous state is to delete it and recreate it.
Scenario: Replace database db1 running a single SM on host server0 and a TE on host server1 with the backup from db2.
Both the archive and the journal have dedicated mounted volumes.
db2 was previously created as a copy of db1. This is a more complicated variation of Example 1: Create New Database From Backup.
|
# On server0
#   Assume the db2 backup, db2-2022-04-18, has been copied to the current directory

# Shutdown database db1
nuocmd shutdown database --db-name db1

# Delete it from the domain - this does not physically delete any files
nuocmd delete database --db-name db1
nuocmd delete archive --archive-id 0 --purge

# Check database no longer exists
nuocmd show domain

# Replace archive and journal
rm -R /volumes/archives/db1
mv db2-2022-04-18 /volumes/archives/db1
rm -R /volumes/journals/db1
mv /volumes/archives/db1/journal /volumes/journals/db1

# Ensure correct ownership
chown nuodb:nuodb /volumes/archives/db1
chown nuodb:nuodb /volumes/journals/db1

# Recreate database - note use of --restored option
nuocmd create archive --db-name db1 --server-id server0 --archive-path /volumes/archives/db1 --journal-path /volumes/journals/db1 --restored
nuocmd create database --db-name db1 --dba-user xxx --dba-password xxx --te-server-ids server1
Once this database has been restored, its DBA user name and password will be whatever they were in db2 when the backup was taken.